Showing posts with label party ideas. Show all posts

Wednesday, November 16, 2011

To top it off...

I just love to add a little extra something special to cupcakes ...

like a simple "cupcake topper"!

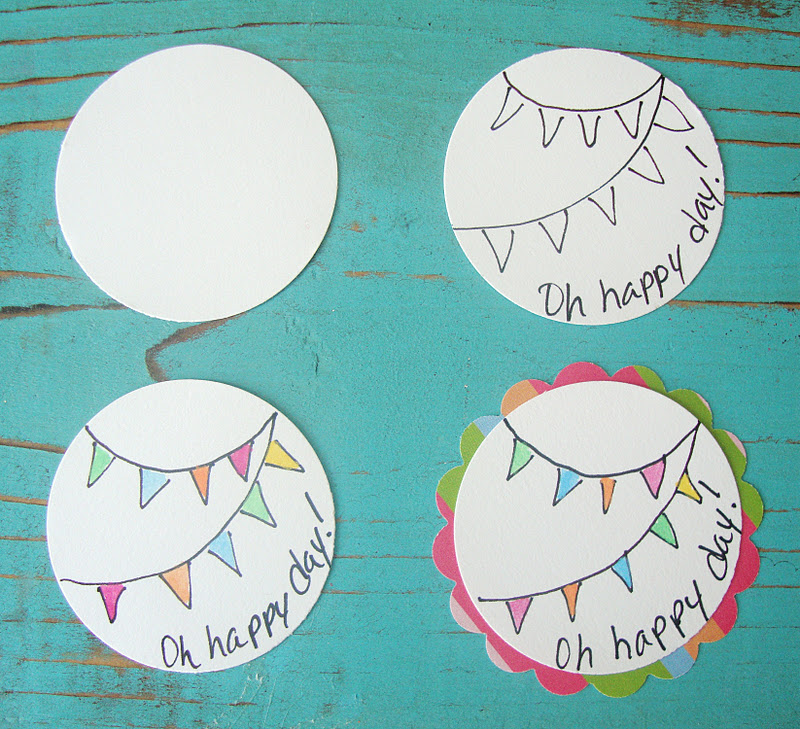
1. punch desired shape using a paper punch
2. draw (or print) your design of choice
3. add a little color with paint (or glitter would be awesome too!)
4. punch another shape from coordinating paper and adhere to first shape

5. place a dab of hot glue to the back of shapes and add stick
6. place another punched shape to the back to cover the glue and stick 
(AND because it's always nice to look pretty from behind too :)!)


7. add a little ribbon 


8. then place atop your yummy cupcake and enjoy!

 off to Princess #2's class
to help celebrate her 9th birthday today!

Oh happy day indeed!

Many Blessings,
Jill

Thursday, April 7, 2011

nesting...

well, creating "noodle nests" that is...
one of the children's favorites they look forward to (and ask for!) every Easter!

a simple little treat, created with:

24 paper baking cups
3 T. butter or margarine
3 T. creamy peanut butter
3 C. mini marshmallows
1 (12oz.) bag chow mein noodles
jelly beans
24 marshmallow chicks

Melt margarine over low heat. Gradually stir in peanut butter, then slowly
add marshmallows. Stir until mixture is melted and smooth.

Remove mixture from heat. Add noodles and stir until noodles are coated.

Spoon mixture into paper lined muffin tins and shape to form nests.

When nests are cool, you may add jelly bean "eggs"...

 and of course a little chick too!

Enjoy!
&
Happy "Nesting"!

Many Blessings!
Jill

p.s. ya'll just blessed me beyond words with all your emails (and comments)
filled with prayers and well wishes!
You are just the sweetest readers! Thank you from the bottom of my heart!-
and the stone is moving along...slowly, but moving!

Monday, November 23, 2009

'Tis the season! - the party...

Princess #1's table...
in keeping with the Christmas/movie theme she chose...
using her favorite colors too!

It all began with these...
It felt a bit like "If you give a Mouse a Cookie"...
if you give a mom the perfect napkins for her daughter's party...

she will create a placemat to go with them...
using fabrics cut in circles and then laminated...


and she will even tie a bow in the top corner...
using blue to go with the napkins...
(but thinking how fun to change the ribbon colors
for different occasions- like lime green for Christmas-
pink and red for Valentines...)


and then she will find ornaments in the perfect color too...
and she will add red glittered initials on them and
tie them to the chandelier...


and then she will get Princess #1 her favorite roses...
which she is so delighted because red are her favorites...


and Oh my goodness!!! she will remember that she
has popcorn dishes in the perfect colors and will use them as
vases to hold the flowers...


seeing the stripes on the "vases" will remind her of
Princess #1's favorite candy...
red and white striped puffy peppermints...
(again perfect for the "theme")
and she will scatter them down the table...


smelling the yummy candy will remind her to make the
cupcakes for the party...


and when the cupcakes are all finished she will remember
the napkins with the blue...
and will decide to create a cake topper using blue and red
cardstock, white paper fringe, hot glue...and red glitter...
all because you gave a mom some inspiration...
AND she really loves her Princess #1!

Happy Monday!
Many Blessings!

Friday, November 20, 2009

A favorable peek...

just a little peek at Princess #1's party favors for
this evening...
each sweet guest will have their special place marked
with a small box topped with ribbons, fabrics, and a tag
I created with their names on them...

I just love these little boxes!
You can sneak a little peek at the gift inside
through the little window on top!
They are REALLY cupcake boxes, but I like to use them for
other gifts too!
(you can find them at http://www.bakeitpretty.com/-
along with lots of other fun goodies!)

Inside the girls will find an ornament I made,
their initial in red glitter with a bow on top...
nestled among tinsel and peppermints...
in keeping with our "Christmas" theme...
I think these would make darling (budget friendly!) Christmas
gifts too!


Have a wonderful weekend!
See you Monday with ALL the details of the party!
Many Blessings!

Tuesday, November 17, 2009

Dressing the table...a tutorial

When I first saw a tablecloth similar to this one
on a vendor's table at a local show,
I absolutely loved it!
I thought it would be so fun to make and use for many
special occasions!
The vendor was kind enough to share the basic instructions
and just how INCREDIBLY SIMPLE it was to make!
(even for a non-(real)sewer-like me!)

Here is what you will need:
-Large clear piece of vinyl-found in fabric stores, on a bolt
measure your table adding 1/4 inch on all sides
-hole punch
-scissors
-several fabrics (or ribbons) cut in 2 yards each

cut your fabrics (or ribbons) in about 1- 1 1/2 inch strips,
or your desired width- I just guessed on all mine

punch holes all the way around your tablecloth- again I just guessed
on mine- but, most were about an inch apart-
just remember the more holes, the more strips of fabric
and the more "full" your skirt will be


fold a strip of fabric in half and thread through the top of your cloth


pull through a few inches- just enough to allow you to
pull the fabric strip bottoms through the loop

and put the strips through the loop

and pull tight- you could tie your fabric (or ribbons) on- but,
I like the loop so you can change your materials for
different occasions

and THAT'S IT!!!
SUPER SIMPLE!!!
I love the clear vinyl top-
so you can just wipe it clean...and great for little ones to craft on too!

and you can add different fabrics underneath...
even pictures would be fun!
(and they are all protected under the vinyl top!)


Hope these instructions were helpful!


Happy creating!
Blessings!

Monday, November 16, 2009

Rise and Shine!- the party...

The table was set...


complete with a new tablecloth made by mommy...
(tutorial coming tomorrow!)


The donut cake was ready!


even a few "special" friends were ready...
all dressed in their P.J.s too!

Then the games began!
a curler toss...
one of the favorites of the morning!

pillowcases they painted and got to take home along with
their goodie bags...

the pillowcase race...
like a sack race...
Odie (our sweet golden retriever) was in charge of this game...
he did a fine job keeping them in line...

and a sure sign the party was a success!
What a delightful morning!!

Then one of the most important things...
sending a "shower of thanks" for all
the thoughtful gifts...
I created a fill-in note with a girl I painted
in some of Princess #2's favorite colors...
she loved getting them ready to mail to her friends!

and we can't forget the cupcakes we sent to school!!
Princess #2 and I worked on them together...
her favorite part was the green edible glitter!
(like mother, like daughter!)

I made the cupcake toppers using different punches,
Amy Butler papers, candy sticks, and hot glue...so fun!

A very Happy Birthday for one of our greatest Blessings!
Our little miracle, Princess #2!


Happy Monday!
Many Blessings!

Friday, November 13, 2009

'Tis the season!

to celebrate!...
BIRTHDAYS in our house!!!
*one*week*apart*

Princess #1's invitations...
similar to Princess #2's-
stitched, painted, printed, cut

with one extra thing...
a little sparkle!
(a.k.a. glitter)


Have a wonderful weekend!
See you Monday with the details from
Princess #2's party!


Many Blessings!

Monday, November 9, 2009

La Petite Couture

A.K.A. clothespins...
quite literally!

made with lots of love!

and snippets from the scrap jar!


to hold the placecards atop a little
bag of goodies for Princess #2's party!


Happy Monday!
Many Blessings!