Showing posts with label painting. Show all posts

Tuesday, January 17, 2012

Lighten up!

There's just something about gray winter days
that make me look around and want to add a little light.


 I decided to brighten an old pair of lamps I haven't used in several years.
(just in case I completely ruined them!)
I mixed together an antique white paint with a small amount of antiquing glaze,
then dry brushed the entire surface, after, I lightly rubbed several spots with a soft cloth 
before the paint mixture had dried- giving them a touch of an aged patina look.

I placed them in a "darker" spot, in hopes they would help lighten things a bit...
 

and I do think they helped!
How about you, do you tend to want to "lighten" things during the gray winter days too? 

Wishing you a bright-light-filled day!
love & blessings!
Jill

Wednesday, November 16, 2011

To top it off...

I just love to add a little extra something special to cupcakes ...

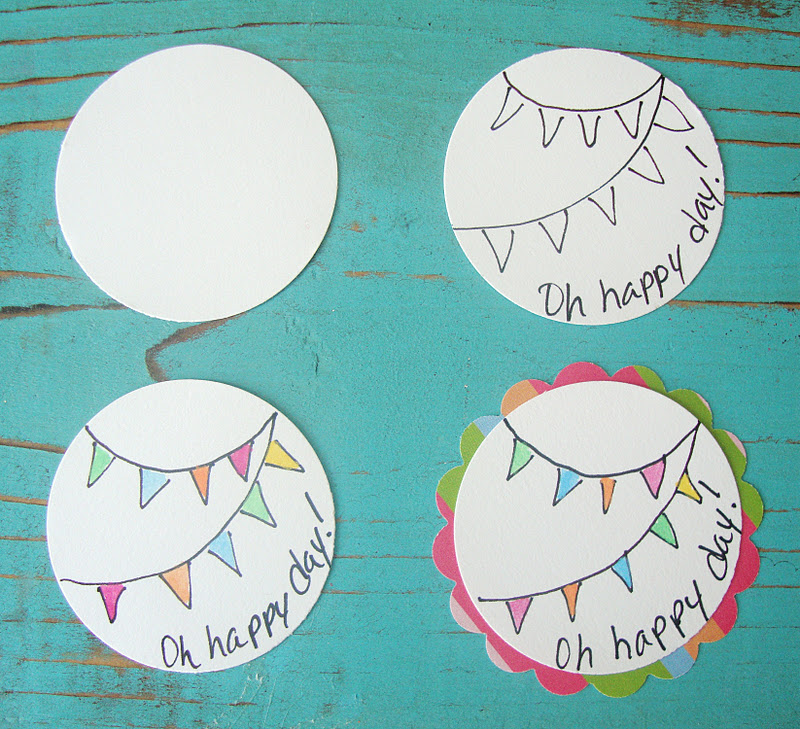
like a simple "cupcake topper"!

1. punch desired shape using a paper punch
2. draw (or print) your design of choice
3. add a little color with paint (or glitter would be awesome too!)
4. punch another shape from coordinating paper and adhere to first shape

5. place a dab of hot glue to the back of shapes and add stick
6. place another punched shape to the back to cover the glue and stick 
(AND because it's always nice to look pretty from behind too :)!)


7. add a little ribbon 


8. then place atop your yummy cupcake and enjoy!

 off to Princess #2's class
to help celebrate her 9th birthday today!

Oh happy day indeed!

Many Blessings,
Jill

Wednesday, May 4, 2011

handing your heart to mom...

precious hand prints,
forming the shape of a heart!
A little project I created for Princess #2's class...
a gift for Mother's Day!

so sweet and simple, I thought I would share...
I used a canvas panel, paints, a strip of natural linen material & not shown- acrylic sealer

1. paint entire canvas background color, I chose a Spa Blue
2. I created a "frame" by rubbing a brown antiquing medium around the edges
3. to soften the brown edges, I then dry-brushed a bit of Oyster White around the edges
4. I then poured the Barn Red paint on a paper plate, dipped each child's hands in
and placed them gently on the canvas to form the shape of the heart
 (after the hand prints dried, I did spray the entire canvas with an acrylic sealer)

5. I used a strip of natural linen, cut to desired length,
hot-glued to the back of the canvas,
   then tied in a bow, (leaving a little room to use for hanging)
6. or to place on a stand...and enjoy!

Truly a treasure...
  created from precious little hands!

 and now I'm off to add the bows to the rest of the classes "hearts"...
so on Sunday they will be able to "hand their hearts to Mom!"

Have a happy day!
love & blessings!
Jill

Thursday, March 31, 2011

coffee talk...

 a simple little set of coffee mugs I created for a few gifts...
(and a set for us to keep as well!)

beginning with solid colored mugs,
and using a porcelain paint pen (following the directions found on the pen)

I painted words chosen from some of my favorite scriptures,
with simple illustrations...

for the gifts:
I printed out the words, followed by the scripture that I had used for inspiration,
and enclosed it with the set of  mugs...

just in case you would like to create a set (or two!)  for someone (or yourself!)
I'd love to share my list with you! 
  just click the picture and print! 

  
and now I'm off to enjoy my "coffee talk" for today...
I think I'll choose "shine"- with an extra muffin too!

Have a wonderful weekend!
love & blessings!
Jill

Friday, November 5, 2010

just a thought...

"Thankfulness...

the soil where joy grows."

Have a wonderful weekend!
Many Blessings!
Jill

Monday, October 18, 2010

"Sunset at His House"

the title chosen for an evening filled with sweet friends
 and a little painting...

a perfect combination!

as brush strokes were made and conversation shared...
in just a few short hours paintings began to take shape...

what a delight to see each ones variations!
all so lovely!

truly a night to remember...

"Sunset at His House"

"sweet friendship refreshes the soul"
Proverbs 27:9

Happy Monday!
Many Blessings!
Jill

p.s. I'm joining my sweet friend Heather's "life made lovely" Monday!

Monday, February 15, 2010

Gone to the dogs...

while working on this collage/painting recently...
I began to fall in love with the idea of a "little" dog...

I thought it might be fun for Odie to have a little friend ...
I decided to present my idea to him...

"what?"
"you want me to consider the idea of a 'little' dog?"
"as a "little" friend?"
"you want me to 'just take a look'?"

"really?"


"where do you get these ideas?"


"I mean aren't I just the BEST dog ever- do you REALLY need
another 'little' dog?"
"I don't need a 'little' friend."
"I just love ya'll!"

"you want me to just take another look?"
"keep an open-mind?"


"Nope! still think I like the idea of being the ONLY dog-
without a 'little' friend!"

*seriously*
"people!- they come-up with the craziest ideas!"


Happy Monday!
Many Blessings!

Monday, February 1, 2010

My top 3 daily survival rules:

the three "C's"...

1. cupcakes!

2. create!


-an absolute must!


3. carry on!

What are some of yours?

Happy Monday!
Many Blessings!

My three "C's" can be found here:
- cupcake plaque by Jenny's Bake shop
-create signs will be in my shop next week!
-carry on glass paperweights in my shop tonight!

Friday, January 29, 2010

Got 10 minutes?

then you can make this...


it's "sew" simple...


I began with this adorable fabric I found at Hobby Lobby...
(it comes in white and black too!)
it's a ruffled knit... I purchased one yard...

you will only need scissors, needle and matching thread...


carefully cut between two ruffles-
as close as possible to the edge of one ruffle...

I chose to cut in sections of three ruffles-
this allowed me to make three scarfs
and have extra for the ends...

cut the "extra" ruffle into desired length...
(to gather and sew to each end of the scarf)
stitch down the center and gently pull to create a gather...


then attach to each end of the scarf...
stitching along the same stitch used to create the gathered ruffle...


now both ends have a finished edge with fun little ruffle!


and you are ready to enjoy your happy "ruffle scarf"!
you can even accessorize it with a pin or one of my FAVORITES-
from my sweet friend Diana of FrontNcenter designs- her convertables!-
you can wear them as a headband or clip!

and the extra scarfs you made can be wrapped-up
to give as a delightful Valentine gift!

just a little something that's "sew" simple...
yet very thoughtful!


Have a wonderful weekend!
Many Blessings!